PXE Booting RHEL/CentOS (or most other Linux distros)
Introduction
I’m a big fan of installing my operating systems over the network. For many years, I’ve been netbooting Solaris, NetBSD, or OpenBSD on various “real UNIX” platforms like SUN’s SPARC hardware, or VAXen. In the old days, it wasn’t common for PCs to come with the required firmware for netbooting. Times have changed, and now almost every PC Ethernet card comes with the appropriate firmware.
In the PC world, the netbooting standard is called the Preboot eXecution Environment, or PXE. The standard relies on DHCP and TFTP. There is an open source project, called iPXE, which allows the use of more modern protocols, but I won’t cover that in this blog because most hardware only supports the older protocols. This post will cover the basic of a PXE boot server to install RHEL (or CentOS) via PXE and NFS. Most of this information is broadly applicable to all other Linux distributions. All the commands and configurations will be for RHEL/CentOS 7, but I’ll highlight specific differences for RHEL/CentOS 6 as I know them.
A RHEL/CentOS server is not needed to PXE-boot other RHEL systems. Any operating system that can provide DHCP, TFTP, and NFS will do. However, using RHEL/CentOS as the server limits the amount of weird issues due to minor incompatibilities (especially with NFS).
Four major components have to be configured:
- DHCPd – to give clients their network details as well as the location of the TFTP server
- TFTPd – serves the pxelinux boot loader, configuration, Linux kernel and initial RAM disk
- pxelinux – the bootloader
- NFS – serves the installation medium for RHEL
Firewall
If using a firewall, several ports must be opened. For firewalld, the following services should be sufficient:
firewall-cmd --add-service=tftp --permanent
firewall-cmd --add-service=dhcp --permanent
firewall-cmd --add-service=nfs --permanent
firewall-cmd --add-service=mountd --permanent
firewall-cmd --add-service=rpc-bind --permanent
firewall-cmd --reload
TFTPd
First priority is to set up the Trivial File Transfer Protocol daemon (TFTPd). TFTP is a simple file transfer protocol that will be used to transfer the boot loader, kernel, and initial RAM disk.
Install the client and the server:
yum install -y tftp
yum install -y tftp-server
In RHEL7, The tftp daemon is a socket activated unit controlled by
systemd. Make sure that the tftp.socket is started. If the tftp
service should automatically start up on boot, also enable it:
systemctl start tftp.socket
systemctl enable tftp.socket
systemctl status tftp.socket
Output of the status command should look something like the below:
● tftp.socket - Tftp Server Activation Socket
Loaded: loaded (/usr/lib/systemd/system/tftp.socket; enabled; vendor preset: disabled)
Active: active (listening) since Tue 2016-08-30 16:04:37 EDT; 1s ago
Listen: [::]:69 (Datagram)

Aug 30 16:04:37 galadriel.cscc systemd[1]: Listening on Tftp Server Activation Socket.
Aug 30 16:04:37 galadriel.cscc systemd[1]: Starting Tftp Server Activation Socket.
Now, make sure the /var/lib/tftpboot directory is created, and place a simple file there to test:
mkdir -p /var/lib/tftpboot
chmod +r /var/lib/tftpboot/hosts
restorecon -Rv /var/lib/tftpboot/hosts
cp /etc/hosts /var/lib/tftpboot
cd ~

# tftp localhost
tftp> get hosts
tftp> quit

rm /var/lib/tftpboot/hosts
If you can successfully download the file, then we’re all set. If a firewall is enabled, then ports may have to be open for the service to work.
In RHEL6, TFTPd is invoked by xinitd, so edit /etc/xinetd.d/tftp, and
make sure that the service is enabled. Restart xinetd after making
any changes.
DHCP
After configuring TFTP, the next step is to install and configure DHCP. TFTPd and DHCP do not have to be on the same server, so if there is already a DHCP server on the network, then this configuration will have to be integrated into that. Good luck if you’re using a consumer router.
yum install -y dhcp

systemctl enable dhcpd
systemctl start dhcpd
The DHCP configuration differs subtly between RHEL6 and RHEL7.
; This is configuration for RHEL 7
option space pxelinux;
option pxelinux.magic code 208 = string;
option pxelinux.configfile code 209 = text;
option pxelinux.pathprefix code 210 = text;
option pxelinux.reboottime code 211 = unsigned integer 32;
option architecture-type code 93 = unsigned integer 16;

subnet 172.31.0.0 netmask 255.255.255.0 {
  option routers 172.31.0.254;
  range 172.31.0.50 172.31.0.80;


  class "pxeclients" {
    match if substring (option vendor-class-identifier, 0, 9) = "PXEClient";
    next-server 172.31.0.21;
    filename "pxelinux/pxelinux.0";
  }

  ; Define some fixed hosts based on MAC addresses
  ; if a host is not defined here, then it will get an
  ; address out of the pool assigned by the range option.
  host sam {
    hardware ethernet 00:30:18:a9:57:18;
    fixed-address 172.31.0.20;
  }
}
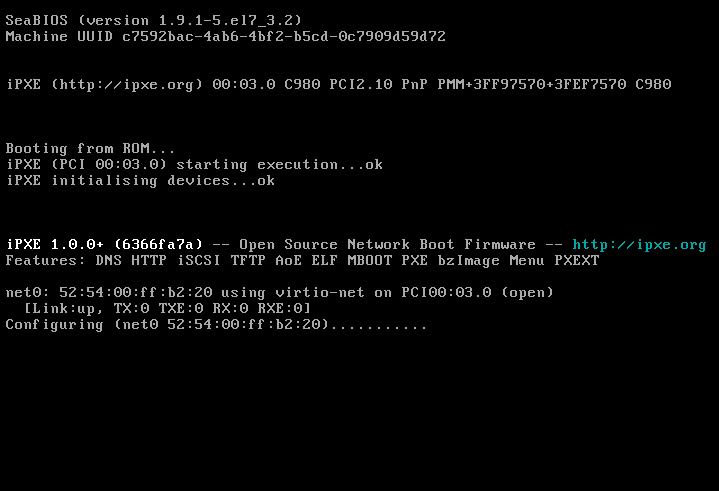
Boot process
During a PXE boot, the system will broadcast a request for network information from the DHCP. After receiving a DHCP lease, the system will initiate a TFTP connection to the host identified in the next-server option and attempt to pull down the file listed in the filename option. This file is a bootloader, a small executable that’s responsible for loading the kernel and starting the boot process. The PXE bootloader is the equivalent of GRUB or LILO.
Bootloader and Configuration
pxelinux.0 comes from the Syslinux
project. In RHEL in the syslinux package and the package places these
files in /usr/share/syslinux and a corresponding documentation
folder in /usr/share/doc/syslinux-X.XX (replaces the X’s with the
right version number). To set up a PXE server, we don’t actually need
the package installed, just some files from it:
pxelinux.0– This is the main PXE bootloader from the Syslinux project.- One of the following menu programs:
vesamenu.c32– this displays a graphical menu and requires VESA compatible graphicsmenu.c32– this displays a text only menu and is suitable for serial consoles
The two menu programs are simple real-mode COM executables. They implement a simple menu system. There is also a way to implement an advanced menu system with custom C programs, but that’s out of scope for this post.
Both pxelinux.0 and the chosen menu program must live under the TFTP
root /var/lib/tftpboot. They read their configuration file from a
subdirectory pxelinux.cfg. After placing the files, the TFTP root
should look like this:
/var/lib/tftpboot/pxelinux/pxelinux.0
/var/lib/tftpboot/pxelinux/menu.c32
/var/lib/tftpboot/pxelinux/pxelinux.cfg
After starting up, pxelinux will look for a configuration file in
pxelinux.cfg. Configuration files can exist on a per-machine basis or
a per-subnet basis, and so pxelinux will search in a specific
order. For IP-addresses or subnets, pxelinux requires IP address to be
in hexadecimal notation. So, 172.31.0.35 becomes AC1F0023.
/var/lib/tftpboot/pxelinux.cfg/b8945908-d6a6-41a9-611d-74a6ab80b83d <- The UUID of the machine
/var/lib/tftpboot/pxelinux.cfg/aa-bb-cc-dd-ee-ff-00 <- The MAC address
/var/lib/tftpboot/pxelinux.cfg/AC1F0023 <- The host's IP
/var/lib/tftpboot/pxelinux.cfg/AC1F002  <- Various subnets, based of the host's IP
/var/lib/tftpboot/pxelinux.cfg/AC1F00
/var/lib/tftpboot/pxelinux.cfg/AC1F0
/var/lib/tftpboot/pxelinux.cfg/AC1F
/var/lib/tftpboot/pxelinux.cfg/AC1
/var/lib/tftpboot/pxelinux.cfg/AC
/var/lib/tftpboot/pxelinux.cfg/A
/var/lib/tftpboot/pxelinux.cfg/default <- The Default
Generally speaking, I always use IP addresses when setting up machine-specific files. The UUID is unreliable (some BIOS’s don’t implement it correctly), and MAC address is too long.
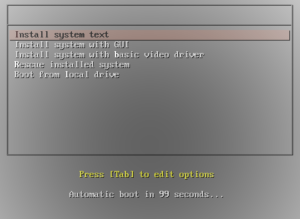
Let’s look at a simple configuration. This is the default configuration I used for PXE-booting RHEL7.
    UI vesamenu.c32
    TIMEOUT 600

    label linux
    menu label ^Install system text
    menu default
    kernel rhel-7.3/vmlinuz
    append initrd=rhel-7.3/initrd.img ip=dhcp inst.text inst.repo=nfs:172.31.0.21:/export/media/rhel-7.3 inst.dd=http://172.31.0.21/cciss.iso

	label linux
    menu label ^Install system with GUI
    kernel rhel-7.3/vmlinuz
    append initrd=rhel-7.3/initrd.img ip=dhcp inst.repo=nfs:172.31.0.21:/export/media/rhel-7.3

	label vesa
    menu label Install system with ^basic video driver
    kernel rhel-7.3/vmlinuz
    append initrd=rhel-7.3/initrd.img ip=dhcp inst.xdriver=vesa nomodeset inst.repo=nfs:172.31.0.21:/export/media/rhel-7.3

	label rescue
    menu label ^Rescue installed system
    kernel rhel-7.3/vmlinuz
    append initrd=rhel-7.3/initrd.img rescue

	label local
    menu label Boot from ^local drive
    localboot 0
The documentation for this file is going to be in
/usr/share/doc/syslinux-4.05/syslinux.txt and
/usr/share/doc/syslinux-4.05/menu.txt. However, this default file
should be enough to get started with. Let’s go through the parameters:
UI vesamenu.c32- This loads vesamenu.c32 in as the user interface. pxelinux has its own command line, but it is cumbersome to use.TIMEOUT 600- This sets the automatic time out to 60 seconds (unit in 1/10th of a second)label linux- This creates a menu entry.
The really interesting bit here is things under the label definition. Each defines a boot configuration which shows up in the menu. There are several menu entries in my default config.
menu label- Human readable label for the menumenu default- Default selection if timeout is exceededkernel- Kernel file to startappend- Options to give to the kernellocalboot- Boot from local disk
In my configuration, I have several of these menu files for various
purposes. Notably, I have different files for RHEL6 and RHEL7, as well
as other special case machines. Below is a listing of my
pxelinux.cfg directory:
lrwxrwxrwx. 1 root root  15 Aug 30  2016 AC1F0014 -> ./rhel-6.8-i386
lrwxrwxrwx. 1 root root   9 Mar 10 14:49 AC1F0023 -> ./yavanna
lrwxrwxrwx. 1 root root  10 Feb 17  2017 default -> ./rhel-7.3
-rw-r--r--. 1 root root 127 Aug 30  2016 localonly
-rw-r--r--. 1 root root 711 Aug 30  2016 rhel-6.8-i386
-rw-r--r--. 1 root root 819 Aug 25 12:07 rhel-7.3
-rw-r--r--. 1 root root 359 Mar 10 23:54 yavanna
My default file links to my rhel-7.3 configuration, since most of my
machines are RHEL7. My machine with IP 172.31.0.20 (AC1F0014) is my
only remaining RHEL 6 machine. My machine with IP 172.31.0.35
(AC1F0023) has its own special configuration. I manage most of this
configuration with symlinks.
Linux Kernel and Initial RAM Disk
The menu configuration lists a Kernel and some options. The most important option is the initial RAM disk, initrd. This file contains a minature Linux install that boot straps the system. In a normal system boot, the kernel loads the initial RAM disk, which contains early boot programs that set up the system. In the case of installation, the inital RAM disk contains the installation program, anaconda, and other useful utilties.
Normally, I grab both the kernel and the initrd from the installation
DVD. From the root of the DVD, these files are located in
images/pxeboot:
-r--r--r--. 1 root root 44701632 Oct 19  2016 initrd.img
-r--r--r--. 1 root root      664 Oct 19  2016 TRANS.TBL
-r--r--r--. 1 root root 50359056 Oct 19  2016 upgrade.img
-r-xr-xr-x. 1 root root  5391264 Oct 19  2016 vmlinuz
Copy these files to a location within the TFTP root. In the menu
configuration files, paths are relative to the location of
pxelinux.0. So, based on the previous menu configuration example,
/var/lib/tftpboot looks like this:
/var/lib/tftpboot/pxelinux/
/var/lib/tftpboot/pxelinux/pxelinux.0
/var/lib/tftpboot/pxelinux/pxelinux.cfg/
/var/lib/tftpboot/pxelinux/pxelinux.cfg/default
/var/lib/tftpboot/pxelinux/vesamenu.c32
/var/lib/tftpboot/pxelinux/rhel-7.3/initrd.img
/var/lib/tftpboot/pxelinux/rhel-7.3/TRANS.TBL
/var/lib/tftpboot/pxelinux/rhel-7.3/upgrade.img
/var/lib/tftpboot/pxelinux/rhel-7.3/vmlinuz
Strictly speaking, upgrade.img is not needed, but may be useful if
you want to have an “upgrade” menu option.
Besides the initrd option, there are several other useful kernel options:
ip=dhcp- get the host’s IP address via DHCP- inst.text - use text mode for install rather than a GUI
inst.repo=nfs:172.31.0.21:/export/media/rhel-7.3- specifies where the install medium is (example with NFS)inst.dd=http://172.31.0.21/cciss.iso- specifies the location of a Driver Disc, for supplemental drivers
For a full list, see Anaconda boot options in the RHEL 7 documentation set.
NFS Server for Installation Media
RHEL can be installed from a few different install medium, but NFS is,
by far, the best when netbooting. The inst.repo option expects to
point to the root of the RHEL install DVD.
Copy all the files from the RHEL 7.3 server to a place on the PXE
server. This example uses /export/media/rhel-7.3.
$ mount /path/to/rhel-server-7.3-x86_64-dvd.iso /mnt
$ mkdir -p /export/media/rhel-7.3
$ cd /export/media/rhel-7.3
$ rsync -avz /mnt/ .
rsync -avz /mnt/ .
sending incremental file list


sent 207017 bytes  received 137 bytes  82861.60 bytes/sec
total size is 3896407530  speedup is 18809.23
Put an export into /etc/exports:
/export/media/rhel-7.3 *(ro)
Start or restart nfs-server.service:
$ systemctl enable nfs-server
$ systemctl start nfs-server
$ exportfs -r
Putting it all together
If all the different components are correctly configured, hosts should now be able to network boot from the PXE server:
After booting, the menu should display. If using vesamenu.c32, it
should look like the below: